

This article reviews a simple, lightweight Objective-C workflow component for iOS applications. The source code and demo app can be downloaded from GitHub and freely used under the permissive MIT license.
Repository: https://github.com/ijoshsmith/iOS-Workflow
Workflow as a conceptual tool
Workflow diagrams are often used to investigate and document complex problems. They consist of boxes connected by arrows. A box can represent various things, depending on its shape, but for our purposes here it represents a decision or a work item.
Decision boxes have two or more arrows pointing away from them, each arrow representing a distinct result for whatever decision was made. A work item box, on the other hand, has no more than one arrow pointing away from it. That arrow shows what happens after the task is completed. If the box does not have an arrow pointing at another box, it is a final node in the workflow. A workflow can have more than one final node, if necessary.
Daunting problems can be decomposed, rationalized, discussed, and solved using this modest set of tools. However, solving a problem in the abstract is not the same as implementing that solution in code. Converting the solution depicted by a workflow diagram into robust code that can deal with the realities of software, such as asynchronous Web service calls that might fail, is no small job.
Workflow as a design pattern
I have learned a simple truth through experience. If the solution to a problem is complicated enough that you need a workflow diagram to understand it, you should structure that solution in code as a workflow, if possible. The conceptual tools used to create and understand the solution to a difficult problem can, and should, be leveraged when implementing and troubleshooting that solution in source code.
The biggest benefit of structuring your solution as a workflow is that the plumbing needed to coordinate disparate, asynchronous decisions and work items does not interfere with the code that solves a complex problem. Domain logic is complicated enough by itself! Another major advantage of having direct correspondence between a workflow diagram and class files is that the diagram turns into a map of your code base, which can be very helpful (especially if you add the diagram file to your Xcode project).
After using this approach in two large iOS projects, both of which worked out very well, I decided to create a component that can be reused in any iOS app to model code as a workflow consisting of decisions and work items.
Introducing JASWorkflow
I set out to create a lightweight, yet useful, workflow implementation. Nothing too fancy, just the bare essentials for what I believe is needed by most apps that benefit from using a workflow to solve a complicated problem. Here is a list of features in JASWorkflow:
- A workflow node can represent a binary decision (yes/no) or a work item.
- When executed, a node can immediately return its final result, or indicate that its result is “pending” and report the real result later. This is useful for async processing, such as calling a Web service.
- You can provide the workflow with a completion block that will be invoked when it finishes executing its nodes.
- You can explain to a workflow how to translate the result of a final node into a semantically relevant outcome value, which is passed to your completion block.
- Your completion block and every executed node runs on the same thread from which your code started executing the workflow.
- A workflow object is self-preserving. It prevents itself from being deallocated while executing, so that your code does not need to hold a strong reference to the workflow object until it completes.
- An executing workflow supports cancellation.
- A completed workflow supports reuse (e.g. reset and executed again).
- Nodes can share data with each other via the workflow’s userInfo property.
The rest of this article shows how to put JASWorkflow to use.
Workflow example
For the sake of clarity I present a simplistic workflow example. In reality, the trivial problem solved here would most likely not beckon to be implemented as a workflow, but that is irrelevant for our purposes. It merely provides context for a discussion about implementing a workflow. Without further ado, I give you the Health Workflow:

The workflow diagram above, created with the Grafio app on my iPad, shows the steps needed to determine if a person is healthy. First the test subject is asked if he is willing to exercise. If the answer is No, he is asked if he is injured. An uninjured person who is unwilling to exercise is deemed unhealthy. An injured person’s health status cannot be determined because an injury is a valid reason for not exercising. If the test subject says he is willing to exercise, and then proves it by lifting weights and doing sit-ups, he is considered healthy. I’m not a doctor, but I play one on the Internet!
The demo iPhone app, which is part of the source code download available on GitHub, has a button and label for each possible outcome.

The goal is to execute a Health Workflow when the user taps a button. The workflow must simulate predefined decisions made by the test subject, and then display the workflow’s outcome value next to the button. This allows us to verify that our code is functioning properly for every route through the workflow.
Programmatic workflow representation
Our goal it so convert the workflow diagram seen at the top of the previous section into Objective-C classes, enums, and so forth. Let’s begin that process by creating a diagram equivalent to the one above, but this time each box is labelled with a programmatic identifier.
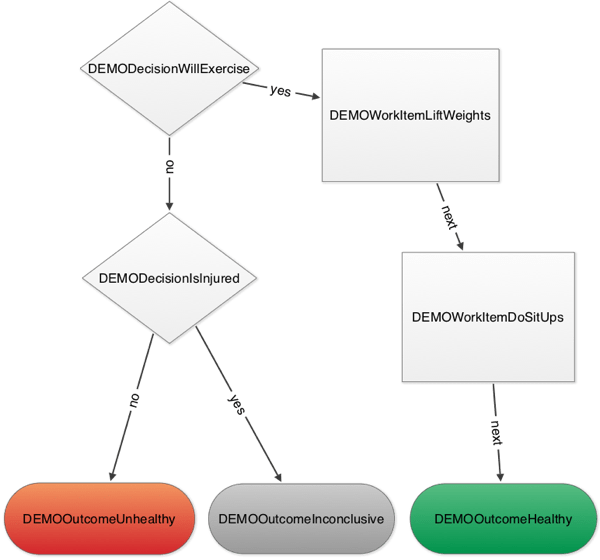
Three rounded boxes at the bottom represent the possible outcomes of a completed workflow, labelled with enum value names. All other boxes are labelled with node class names. Next let’s turn our attention to the outcome values.
Defining outcomes
All three outcomes for the Health Workflow are listed in the DEMOOutcome enum. I also included a helper function that is used when displaying an outcome to the user.

A workflow’s outcome values do not need to be expressed as an enum. Strings, or any other kind of object, would be fine. Later on I show how these values are associated with nodes, so that a workflow can translate a final node’s result to some meaningful outcome value.
Implementing nodes
The real brains of a workflow is in its nodes. Each discrete decision and item of work should be encapsulated in a subclass of JASDecision or JASWorkItem. Both of those classes are direct subclasses of JASWorkflowNode, as shown in the abridged class declarations below:

Note that JASWorkflowNode does not have any awareness of other nodes. Its two subclasses introduce properties that enable nodes to be linked together. The names of those properties are closely tied to values in the JASWorkflowNodeResult enum seen previously. For example, JASDecision’s yes property references the next node to execute if the decision node’s result is JASWorkflowNodeYes.
Below is the node that represents the decision of whether or not the test subject is willing to exercise. The mockResult property is needed for testing purposes, since this node does not actually know how to do anything aside from return a mocked result value.

The implementation of this decision node is seen below.

Keep in mind, in a real app each node would add value to a workflow, not simply return an externally determined result. I won’t bother showing the DEMODecisionIsInjured class, since it is very similar to the code seen above. Instead, let’s now see how a work item node is declared:

This node does not immediately produce its final value. The node returns ‘Pending’ from the execute method, and two seconds later reports back to the workflow a result of ‘Complete’. During those two seconds the workflow sleeps, allowing the thread on which it runs to do other work. This delayed completion emulates a node that must wait for a Web service to respond, or any other asynchronous event needed by iOS apps.

The DEMOWorkItemLiftWeights class is very similar to this, so I won’t bore you with it.
Executing a workflow
Now that we have defined outcomes and nodes it is time to compose them into a workflow. Before diving into the code that creates and executes a workflow, first let’s review an abridged declaration of the JASWorkflow class. The complete class declaration is full of informative, yet verbose, API documentation.

In a previous section I showed the user interface for the demo app, which displays a button and label for each of the three possible Health Workflow outcomes. Here is the action method for a button that tests which outcome is produced if the test subject will not exercise because he is injured (which, I remind you, should be ‘Inconclusive’):

That method calls a helper method responsible for creating a workflow with predefined decision values, executing the workflow, and updating a label with the result.

The first thing the above method does is call into yet another helper method to create a JASWorkflow and return, via an out parameter, the first node to execute. We will visit that method shortly, but for now turn your focus to the use of the startExecutingWithNode:completion: method.
The first point of interest is that a workflow can start executing at any node, there is no arbitrary enforcement of a “first” node. This increases the flexibility of a workflow, since there may be several viable entry points, determined at run-time.
Although the code shown above does not make it explicit, the startExecutingWithNode:completion: method is a non-blocking call. In other words, the flow of execution does not wait until the workflow completes before moving past a call to that method. When the workflow eventually finishes executing nodes, it will invoke your completion handler block.
The completion handler block accepts three parameters. The first is named outcome and points to a semantically relevant value based on the result of the final node to execute, or nil if no such value exists. In the next method I explain more about this very useful and powerful feature.
The second parameter to the completion handler block is named finalNode and it points to the last node to execute before the workflow completed. If the workflow encountered an error, this node’s error property will point to an NSError object.
The last parameter is named cancelled and it will be YES if the workflow was cancelled via the cancel method. If the workflow was cancelled, the outcome and finalNode arguments will be nil.
Next up is the method that creates and configures a workflow and its nodes. This is where the magic happens.

I annotated each part of that method with a letter to assist with explaining how it works.
Part A is equivalent to drawing boxes in a workflow diagram. This is where the four workflow nodes are created. Note that a node can be passed data via its initializer, such as the initWithCount: method for the sit-ups node, or via properties, accessor methods, etc. Alternatively, nodes can access and share data by using the workflow’s userInfo property, which exposes a mutable dictionary.
Part B uses Key-Value Coding to set up mock return values for both decision nodes. I use KVC instead of a direct property assignment because those variables are typed as JASDecision pointers, and that class does not declare the mockResult property (both of its subclasses declare that property).
Part C is equivalent to drawing arrows between boxes in a workflow diagram. This is where the order in which nodes execute is determined.
Part D creates an instance of JASWorkflow that manages four nodes. The workflow object owns (i.e. retains) the nodes passed into its initializer, and only those nodes. All other pointers to nodes are weak, meaning that a node not passed into the workflow’s initializer will be immediately deallocated unless your code explicitly keeps a strong reference to it. All nodes used in a workflow should be passed to its initializer.
Part E shows how to map the result of a final node to an outcome value. There are three uses of the ifFinalNode:producesResult:evaluateTo: method, one for each value of the DEMOOutcome enum. This is how the workflow knows what value to pass for the outcome parameter of your completion handler block. When a node produces a result, such as JASWorkflowNodeResultNo, for which it does not have a node to execute next, the workflow is complete. At that time, the workflow tries to translate the [finalNode, result] combination into an outcome value. It can only produce an outcome value if your code supplied one via the ifFinalNode:producesResult:evaluateTo: method.
Part F points the rootNode out parameter at the first node to execute, which in this demo is the node that asks if the test subject is willing to exercise.
Summary
I have had nothing but success when applying this approach to implementing complex, asynchronous aspects of production iOS apps. If you are the kind of person who finds workflow diagrams useful, like I do, be sure to consider giving it try next time you’re faced with a gnarly problem whose solution can be clearly expressed with boxes and arrows.
All of the code reviewed here, and more, is available on GitHub.
Happy coding!


I would have some questions about a subject related to your articles (wpf and iOs). How can I contact you ?
Reblogged this on Sutoprise Avenue, A SutoCom Source.