
I just published a command line calculator written in Swift 4.2 with a big README explaining how it all works. What a fun challenge! Enjoy…
https://github.com/ijoshsmith/command-line-calculator

I just published a command line calculator written in Swift 4.2 with a big README explaining how it all works. What a fun challenge! Enjoy…
https://github.com/ijoshsmith/command-line-calculator
If you need to support deep links with a custom URL scheme in your iOS or tvOS app, check out my tidy little API to help convert URLs into deep link objects. It’s written in Swift 3. I published it on GitHub, right here:
https://github.com/ijoshsmith/swift-deep-linking
Suppose you are working on a Swift program that needs a data model to represent a contact, such as a person from the user’s address book or a FaceBook friend. You might start off by modeling this as a Contact struct, like this:
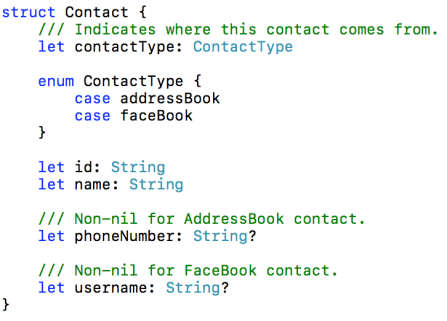
This approach is simple but has a significant drawback. Notice how the Contact struct has two optional properties: phoneNumber and username. These properties are conditionally assigned a value, based on the contact type.

The rules for when each property should be nil are not obvious unless a developer happens to read the property comments. A design like this enables developers to make mistakes that could be easily avoided. It would be better if you could not accidentally access a property whose value is nil, because you forgot to check the contact type.
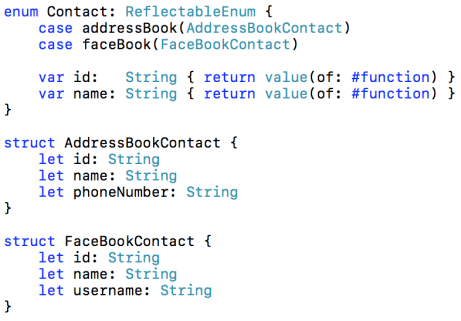
A common way to solve this problem in Swift is to create an enum:

The Contact enum has two cases. Each case has an associated struct value. When working with this enum it is impossible to accidentally access the wrong property, such as an AddressBook contact’s username, or a FaceBook contact’s phone number, because there are separate structs defined for each kind of contact. Those structs contain exactly the values relevant to their contact type. No need for optional properties. Hurrah!
However, there is also a drawback to this approach. In many cases it is convenient to access the properties common to each kind of contact in a uniform manner, like this:

To facilitate this, you could create computed properties on the Contact enum that read the corresponding property from each associated struct value in a switch block.

In this simple example the code above might not seem too bad. But in a realistic application where the data models have many properties, and there are many model entities to deal with, this type of code quickly becomes a tedious chore to write and maintain. Repetitive, boring code is a fertile source of bugs. There must be a better way…
This problem can be remedied through the use of Swift’s Mirror API. Mirrors are Swift’s way of allowing for introspective code; in other words, for code to reflect upon itself at run time. Compared to other platforms, like .NET or Java, a Mirror provides only very rudimentary reflection support, but it’s enough for our purposes here.
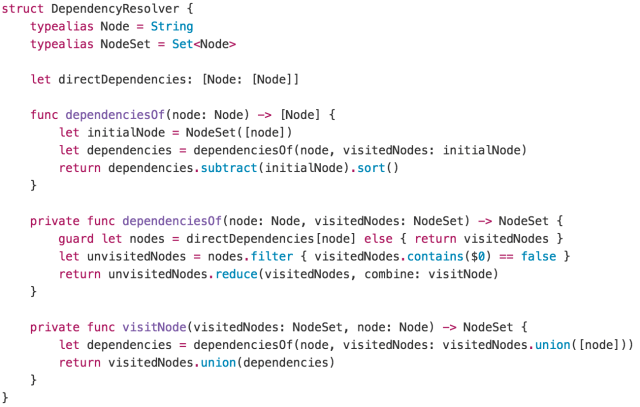
Let’s take a look at my ReflectableEnum protocol:

This protocol’s sole method has a default implementation provided by a protocol extension. It uses Mirrors to peek inside an enum instance and its associated struct in order to find the value of a property. This protocol can be used to alleviate the coding burden seen above, like so:
It’s important that the properties added to Contact have the exact same name as the properties they map to on the structs associated with the enum cases. The usage of Swift’s #function means that the name of the property which calls value(of:) is passed in as the propertyName argument.
The downside to this approach is that it is less safe. This relies on the use of naming conventions. It is not something the compiler can guarantee will work at run time. The implementation of the value(of:) method force-unwraps optional values in several places, which is a sign that this code is going to crash if things are not correctly set up. I want it to crash if it encounters a problem (such as if a struct does not have a property with a certain name and type), but that’s only necessary because the compiler cannot police this kind of code. If you prefer the comfort of knowing that the Swift compiler always has your back, this solution is not for you.
The code presented here is just a rough sketch. It might not meet the needs of your application, but it can be a simple starting point for further enhancements.
An Xcode playground containing the ReflectableEnum code is available here:
https://github.com/ijoshsmith/reflectable-enum
Happy Swifting!
Here is my Swift 3 utility function for turning a live class/struct instance into Equatable protocol code for that type:
https://github.com/ijoshsmith/equatable-code-generator
Here’s to never writing that kind of code ever again!
The way that functional programming languages allow functions to be combined can help make code easier to read and understand. The technique is known as function composition. I show how to compose functions in Swift 3 using custom operators, including a function composition operator that supports optional chaining semantics. It’s available in this GitHub repository:
https://github.com/ijoshsmith/function-composition-in-swift
The article can be read on that repository’s home page, and it’s also available in an Xcode playground. This allows you to experiment with the presented code and immediately see the results. Have fun!
This article presents a high-level overview of how my json2swift tool works.
Several people have expressed interest in using my code as the foundation for a similar tool, or just want to change the Swift code it generates, and have asked for guidance on how to get started. It’s a modest sized program, so this overview will be straightforward.
Here is a map of the pipeline in which JSON is transformed into Swift.

The user specifies a JSON file, represented by the top box in the diagram, when running json2swift on the command line. The JSON file data is read into memory and Apple’s JSONSerialization class tries to convert it into arrays, dictionaries, NSNumber‘s, etc.
Now things get interesting. The JSON objects are analyzed, using a process known as type inference, to create schemas which describe the JSON data entities. The data types that represent a JSON schema are defined here.
Analyzing a JSON document to infer its schema is handled here. However, one of the most useful aspects of json2swift is that it can combine evidence from multiple examples of an attribute, which I refer to as ‘attribute merging’ and have implemented here. An example of this functionality is shown in the Type Inference section of the repository’s README.
At this point the program has done nothing related to Swift whatsoever. If you want to use my JSON type inference engine for a different tool that generates code for languages other than Swift, there won’t be anything Swift-specific getting in your way.
The next step is to translate JSON schemas to data structures that represent the Swift code generated later on. Those abstractions of Swift types are defined in this file. Most of the translation logic is in here.
Last but not least the Swift model is used as a data source for SwiftCodeGenerator, as seen here. This is where you can tweak the tool’s generated Swift code. Once the Swift source code is generated, the tool writes it to a file with a .swift extension in the same directory as the input JSON file.
That’s all folks!
Ever since Swift was first released there has been an endless stream of new libraries to simplify writing Swift code that consumes JSON data. Since this is such a common and tedious aspect of developing apps, it’s an important topic to many Swift developers. In the Swift projects I’ve worked on, we have naturally gravitated toward an implementation pattern quite similar to the approach that Apple advocates. This style does not make use of a third-party library, and is reasonably simple and effective.
Regardless of which approach you take to writing code to consume JSON you still must spend time writing, testing, and fixing code. And let’s face it, writing code to turn JSON into data objects is grunt work. Boring, error-prone, grunt work. Ain’t nobody got time for that!
That’s why I created json2swift; a command line tool that writes your Swift code for you. You provide it with a sample of the JSON data your app consumes, it generates all the Swift code needed to consume that data. You just drop the generated Swift files into your project, rename and rearrange the shiny new code to your heart’s content, and move on to more interesting tasks.
But what about all those sweet JSON libraries that help you write code to turn JSON into Swift objects? Where do they fit in?
A fellow named Vivien recently opened an issue in my json2swift Github repository to ask what I thought about adding support for generating Swift code that uses the popular Unbox JSON library. I understood what he meant, but not why he would ask for such a thing. After a brief discussion, he and I came to an agreement that if you use json2swift there’s no need to continue using a third-party library to turn JSON into Swift data objects. There’s certainly no reason for the tool to generate code that uses a third-party JSON API!
For developers who are not accustomed to working with code generation tools, it might take some getting used to. Think about it this way…
If JSON libraries are a way to make yourself run faster; json2swift is a race car.

I published a tool that analyzes JSON data and generates Swift data model code, named json2swift. This tool helps eliminate most of the error-prone grunt work involved with consuming JSON data in a Swift app. The repository’s README has more details.
https://github.com/ijoshsmith/json2swift
This has been an interesting project to work on, especially building a type inference engine, as described here.
This article introduces a design pattern that I call Concealment, and demonstrates how to use the pattern in Swift code.
The Concealment pattern enables types to support novel, related functionality without adding nonessential members to their interface.
User-defined types can easily be overused in a codebase, giving more prominence to things than necessary. A common example is having a data model entity be involved with tangentially related concerns; such as validation checks, business rule processing, and display formatting. It is preferable to conceal the augmentation and usage of your types behind an API expressly built for a single responsibility, rather than expose those implementation details to all the types’ consumers.
Create a new type that represents the task to be performed. In the new type’s file, add a private extension for each of your pre-existing types whose participation in the task is being concealed. Pass an instance of the new type into the private extension methods, as a form of context, if necessary.
Swift Tip: private type members can be accessed from anywhere in the same file.
This demo project is available on GitHub. It is an iOS app that converts text to Morse code and plays it out loud, inspired by a programming challenge described here.
The Morse code data model is simple, and I wanted it to stay this way.
| /// Represents an entire Morse encoded message. | |
| struct EncodedMessage { let encodedTerms: [EncodedTerm] } | |
| /// Represents a word or number consisting of Morse code symbols. | |
| struct EncodedTerm { let symbols: [Symbol] } | |
| /// Represents a character encoded with Morse code marks. | |
| struct Symbol { let marks: [Mark] } | |
| /// Represents an individual component of a Morse code symbol. | |
| enum Mark: String { case Dot = ".", Dash = "-" } |
The app converts the user’s text input into instances of this abstraction. It must then transform that abstraction into two consumable formats:
It can be tempting to add methods or properties to the data model types to support such transformations, but doing so would reduce the clarity and simplicity of the data model. Instead, let’s conceal the data model’s participation in these transformation tasks, treating their involvement in the task as a mere implementation detail.
Here is how an EncodedMessage is transformed to a string filled with Morse code dots and dashes.
| func createMorseCodeText(from encodedMessage: EncodedMessage) -> String { | |
| let transformation = MorseTransformation( | |
| dot: ".", | |
| dash: "-", | |
| markSeparator: "", | |
| symbolSeparator: " ", | |
| termSeparator: "\n") | |
| let characters = transformation.apply(to: encodedMessage) | |
| return characters.joinWithSeparator("") | |
| } |
Similarly, this is how the same EncodedMessage becomes a sequence of on/off states suitable for transmission (a.k.a. playback).
| enum TransmissionState { | |
| typealias RelativeDuration = Int | |
| case On(RelativeDuration) | |
| case Off(RelativeDuration) | |
| static func createStates(from encodedMessage: EncodedMessage) | |
| -> [TransmissionState] { | |
| let transformation = MorseTransformation( | |
| dot: TransmissionState.On(1), | |
| dash: TransmissionState.On(3), | |
| markSeparator: TransmissionState.Off(1), | |
| symbolSeparator: TransmissionState.Off(3), | |
| termSeparator: TransmissionState.Off(7)) | |
| return transformation.apply(to: encodedMessage) | |
| } | |
| } |
The MorseTransformation<T> struct is responsible for projecting a Morse encoded message into another format. However, as seen below, it merely contains the parameters for a transformation and passes itself to the data model, which does the heavy lifting.
| /// Converts an `EncodedMessage` to an alternate representation. | |
| struct MorseTransformation<T> { | |
| let dot, dash, markSeparator, symbolSeparator, termSeparator: T | |
| func apply(to encodedMessage: EncodedMessage) -> [T] { | |
| return encodedMessage.apply(self) | |
| } | |
| } | |
| private extension EncodedMessage { | |
| func apply<T>(transformation: MorseTransformation<T>) -> [T] { | |
| return encodedTerms | |
| .map { $0.apply(transformation) } | |
| .joinWithSeparator([transformation.termSeparator]) | |
| .toArray() | |
| } | |
| } | |
| private extension EncodedTerm { | |
| func apply<T>(transformation: MorseTransformation<T>) -> [T] { | |
| return symbols | |
| .map { $0.apply(transformation) } | |
| .joinWithSeparator([transformation.symbolSeparator]) | |
| .toArray() | |
| } | |
| } | |
| private extension Symbol { | |
| func apply<T>(transformation: MorseTransformation<T>) -> [T] { | |
| return marks | |
| .map { $0.apply(transformation) } | |
| .joinWithSeparator([transformation.markSeparator]) | |
| .toArray() | |
| } | |
| } | |
| private extension Mark { | |
| func apply<T>(transformation: MorseTransformation<T>) -> [T] { | |
| return [self == .Dot ? transformation.dot : transformation.dash] | |
| } | |
| } | |
| private extension JoinSequence { | |
| func toArray() -> [Base.Generator.Element.Generator.Element] { | |
| return Array(self) | |
| } | |
| } |
Since all of the data model extensions are private, the rest of the codebase does not know about or have access to the methods added to support transformations. Usage of the data model to support this novel functionality is an implementation detail.
The Concealment pattern is only applicable in languages that support private type extensions, or something equivalent. Thanks to Swift’s thoughtful design, it is easy for Swift developers to apply this pattern and keep their types simple.
I published my solution to Dave Thomas’s Transitive Dependencies programming exercise, known as a kata, to GitHub:
https://github.com/ijoshsmith/transitive-dependencies-kata
This exercise involves analyzing a graph data structure which contains nodes that “depend on” other nodes. A graph is represented as direct dependencies between nodes:

The objective is to find all of a node’s dependencies, both direct and indirect, like so:

An interesting complication is that a graph might contain cyclical dependencies, where a node indirectly depends upon itself. A proper solution to this problem must be able to cope with a graph like this:

If this programming challenge interests you, stop reading now and solve the puzzle for yourself! Check out the kata for more information.
My solution relies on three things:
Here’s how I solved this little puzzle:
You can download the Xcode project here.

